

Planning a hut trip can feel overwhelming at first. But with a few simple steps, you can set up a safe and fun multi-day hike. Think of it as laying out your trail: decide how far you’ll go, check your maps and weather, and plan where you’ll rest each night. Getting organized not only saves time but also keeps you safe on the trail. In this guide, we'll share easy steps so you can enjoy clear skies, fresh air, and a warm night in your cozy hut.
Planning Your Hut Trip: A Step-by-Step Overview
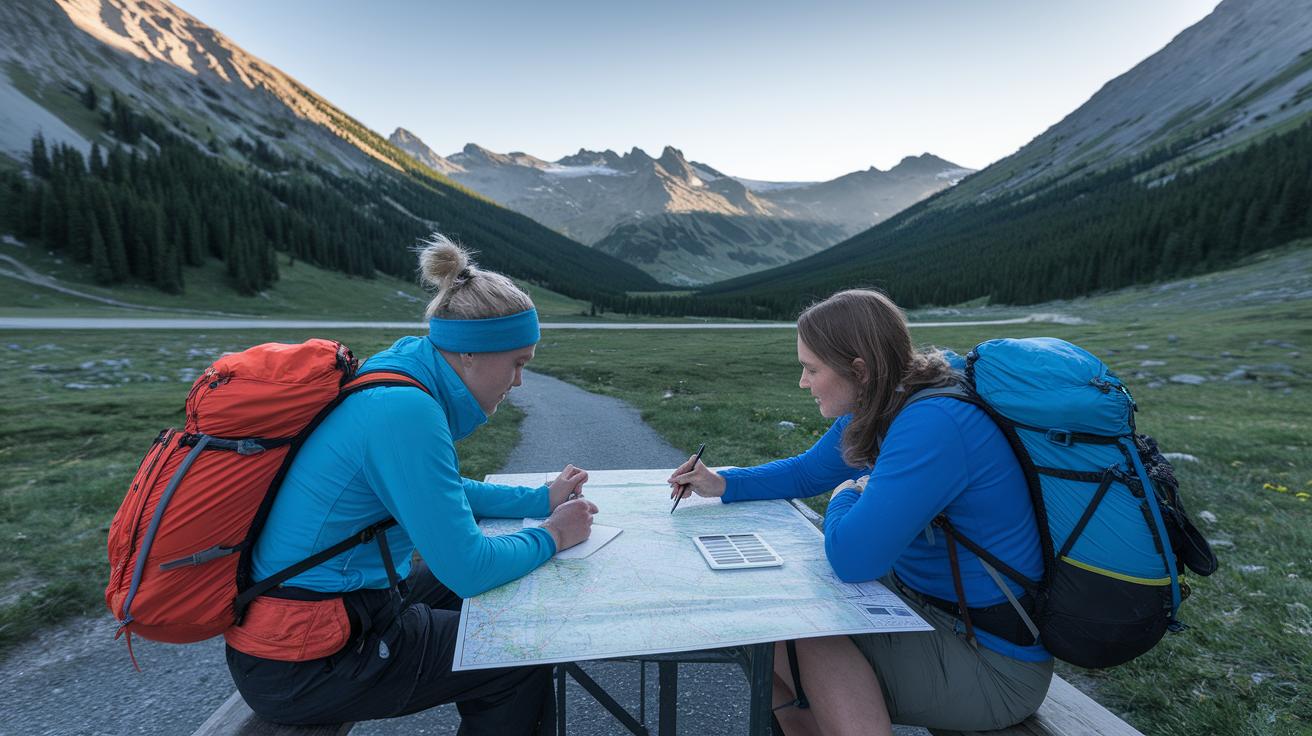
Begin by choosing how many days you want to hike and the difficulty that suits your style. Check your route using trail maps and GPX files (map files you can load onto your phone). Look for huts along the way so you have a place to sleep each night. Plan your daily stages for about 8–13 km (5–8 miles) a day. Think of your plan like steps that build on each other.
Always check the weather and avalanche risk reports before you leave. A clear forecast helps you tweak your plans if needed. Book your huts as early as you can because popular ones fill up fast. Make sure you know each hut’s rules, such as booking policies, seasonal open dates, and cancellation fees. It’s a good idea to verify these details with local operators.
Gather your essential gear first, like an avalanche beacon, shovel, probe, and a well-stocked first aid kit. Add extras like a sturdy talkie, an eye mask with foam ear plugs, and fresh clothing. Plan your meals ahead by splitting cooking duties among your group. Finally, set up safety protocols and share emergency contact numbers with everyone before you head out.
Crafting a Hut Trip Itinerary with Route Mapping Essentials
Start your hut trip planning by checking the latest weather and avalanche reports. Before you head out, look at the forecast so you can adjust your route if conditions change. This helps you know if a storm or high avalanche risk might mean you need a backup plan or extra gear.
Break your route into daily sections of about 8–13 km (5–8 miles) with climbs of around 300–750 m (1,000–2,500 ft). On easier days, you might finish in 5 hours, while steeper days can take a bit longer. It’s smart to plan shorter distances when the climb is gentler and allow extra time when the hills get tough.
Mark your track on a map or load a GPX (a map file your phone uses) to show key spots like water stops, rest breaks, and emergency shelters. Plan a wind-sheltered spot for a lunch break after about three hours of hiking. This pause not only helps you regain energy but also gives you a break from harsh winds.
Watch for natural signs of shifting weather and adjust your breaks if needed. And be sure to share your route and timing with your group so everyone stays on the same page.
| Stage | Distance (mi) | Elevation Gain (ft) | Estimated Duration |
|---|---|---|---|
| Day 1: Trailhead to Hut A | 6.5 | 1,200 | 5–6 hrs |
| Day 2: Hut A to Hut B | 7.2 | 1,800 | 6–7 hrs |
| Day 3: Hut B to Trailhead | 8.0 | 2,100 | 7–8 hrs |
Securing Accommodations: Booking Procedures and Hut Reservations
Begin by checking out each hut's booking rules. Look for details like seasonal open dates, bed limits, and cancellation fees. Some huts ask for deposits or have set booking periods. For popular routes, book 2–3 months early so you don't miss out.
Also, see if any huts need special permits to reach them. Some areas require extra permits. Confirm with local hut staff or authorities so you’re not delayed when you get there.
When you compare options, try different booking sites. Use an online mountain hut booking system to check room availability and prices. This step also shows any extra fees for changes or cancellations. Spending a little time to call or read the details helps you pick a hut that fits your plan and budget.
Essential Gear and Packing List for Your Hut Trip
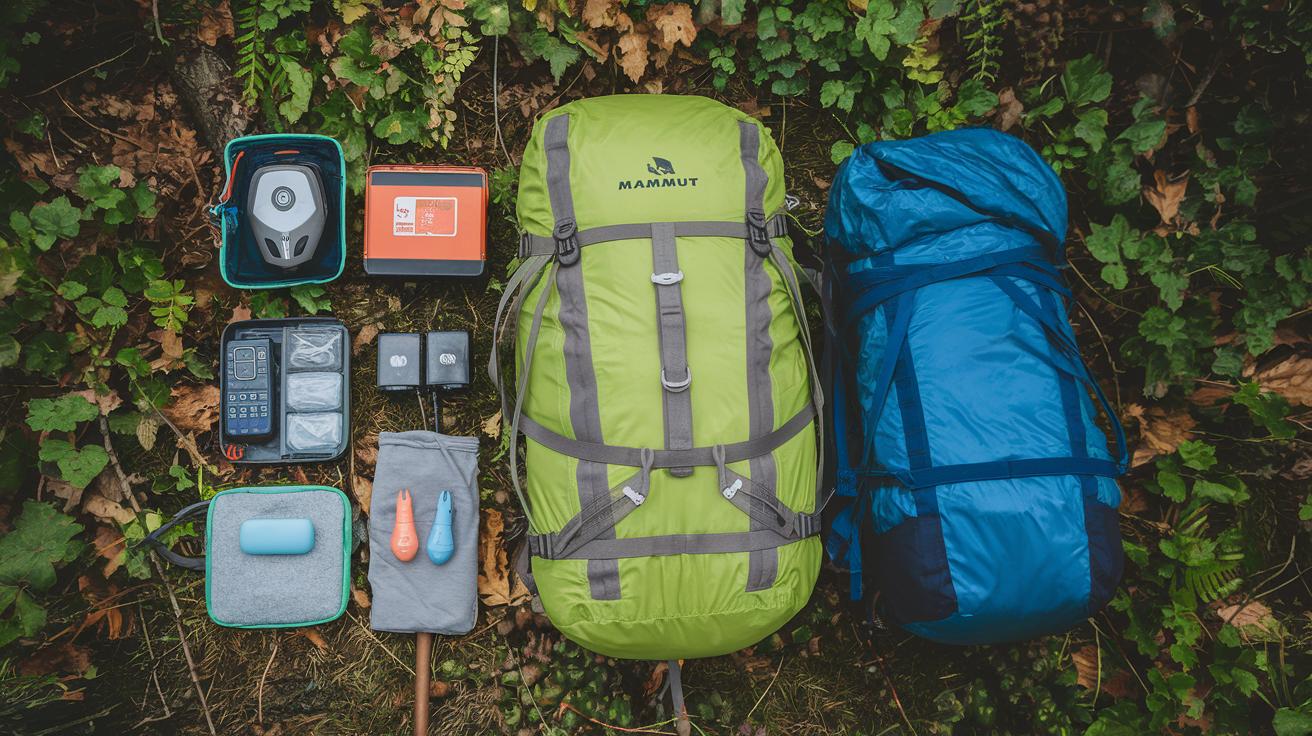
Keep your pack near 50 L total. For example, a lightweight summer sleeping bag uses less than 10 L, your clothes take about 12–15 L, extra gear fills roughly 6–8 L, and food plus drinks need another 12–15 L.
Pack the basics for backcountry safety. Bring an avalanche beacon, shovel, and probe. Add a first aid kit with blister treatments like Glacier Gel Bandages. These items are essential when you venture out to huts.
Boost your comfort with a few extra pieces. A two-way radio with a Mammut biner and backup leash helps keep your group connected. An eye mask and foam ear plugs will block out light and noise so you can sleep well. Also, pack a firestarter kit with a butane lighter or flint for those cool evenings.
For clothing, plan to change your base layers and socks daily to stay fresh. Pack indoor hut booties, a down jacket for warmth when you slow down, and gloves and hats to fend off the cold. On the trail, a breathable waterproof shell jacket is a must if the weather turns. Pair it with soft shell pants that let you move easily.
Before you head out, review a multi-day hiking packing checklist to make sure nothing gets left behind.
Every item in your bag plays a part in keeping your hut trip safe and enjoyable. Stay smart and pack light while being prepared for any weather conditions on your adventure.
Budget-Friendly Planning and Trip Cost Calculation
Start by jotting down every cost you might face on your hut trip. Think about your ride to the trailhead, fuel, parking fees, or even shuttle costs. Remember, hut fees can run from $30 to $70 per night, so plan accordingly. Some areas also have permit fees, so check with local authorities in advance.
Next, sort out your food plans. Will you bring ready-made meals for easy eating, or shop for local ingredients to save a bit more? If you need any extra gear like safety tools or weather-specific equipment, be sure to add those rental costs too.
Break your expenses into clear groups:
| Category | What It Covers |
|---|---|
| Transportation | Car costs, shuttle services, parking fees |
| Lodging | Hut fees per night |
| Permits | Any local access charges or permits |
| Food | Packaged meals or local groceries |
| Equipment | Rentals or extra gear you might need |
By putting a rough price on each area, you get a clear budget that helps you cut costs where you can, without compromising on safety or comfort. Enjoy your planning, and have a great hut adventure!
Safety Protocols and Emergency Response Planning
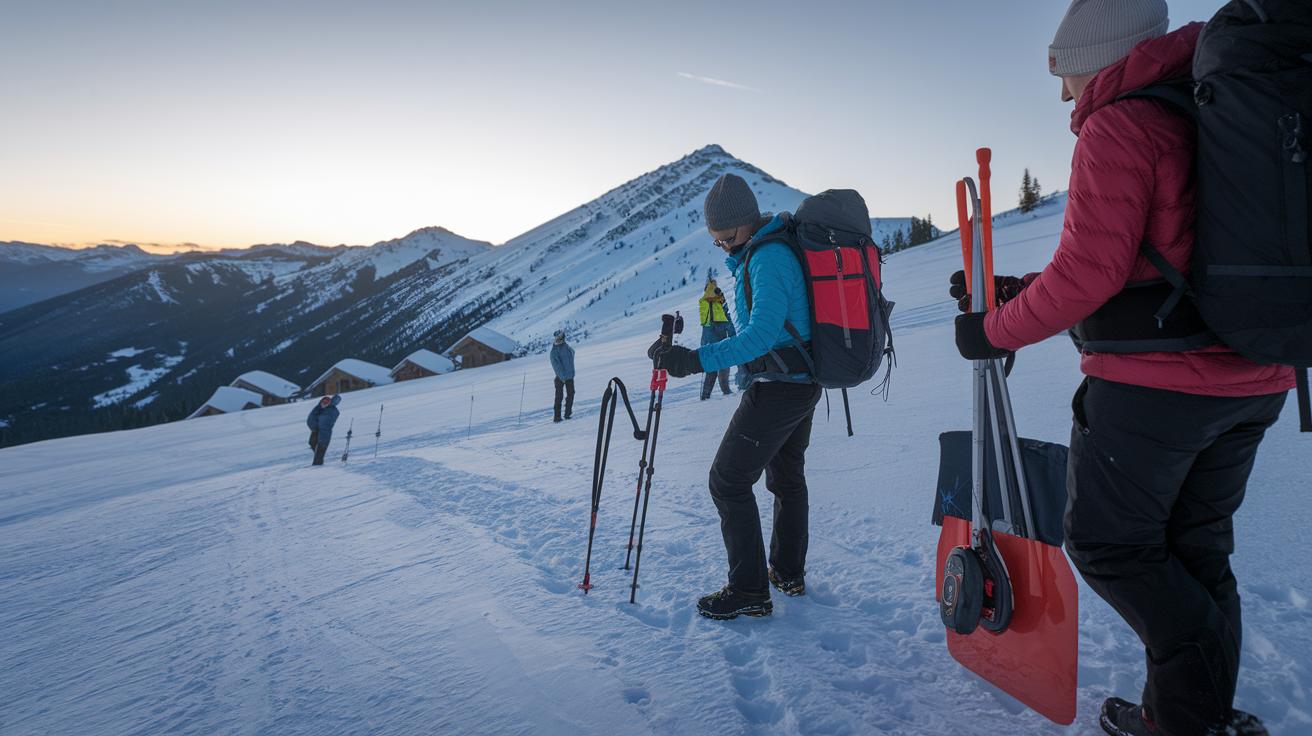
Before you head into the backcountry, check the avalanche risk every day. Mornings can change fast, so take a moment to review conditions before each leg of your hike. Always pack a beacon, shovel, and probe (tools that help you find buried victims in an avalanche). These items belong in your pack every time you leave home.
Plan for emergencies by making a simple checklist that includes:
- Your avalanche beacon, shovel, and probe
- A well-stocked first aid kit with items like Glacier Gel Bandages
- Communication devices such as two-way radios or a charged cell phone
At each hut, leave your skis outside so they do not warm up and then refreeze overnight. Keep climbing skins inside where the temperature stays steady. This little step will help keep your gear in good shape for both going up and coming down.
Talk over the plan with your group before you leave. Everyone should know where the safety gear is and what to do if the weather or conditions get worse. Clear communication and having agreed meeting spots can really help in an emergency.
Make it a habit to review these safety steps together. Knowing who is in charge of each item can be a lifeline if you run into trouble in the mountains.
Nutrition and Group Meal Planning in Mountain Huts
Fueling your trail days and keeping hut dinners simple means planning your meals and drinks before you hit the trail. Divide cooking tasks among your group so each person handles one day’s food. This helps keep your backpack light and clears up confusion. Pre-measure your ingredients into resealable bags to make meal prep quick. This small step saves you time and cuts down on clean-up at the hut.
Mix up your menu with foods that give you energy and a little something to enjoy after a long day. Think about using powdered drink mixes like instant hot apple cider (which some even spice up with a splash of bourbon) or a Salty Margarita mix that works as both hydration and an evening cocktail. These choices give you a boost during the day and a treat when you relax later.
For snacks, pack resealable bags filled with nuts, dried fruits, or granola. Rotating easy-to-carry, nutrient-rich foods helps everyone stay nourished and happy. This way, your group gets a mix of energy and flavor that makes hut mealtime smooth and enjoyable.
What to Expect at Mountain Hut Facilities
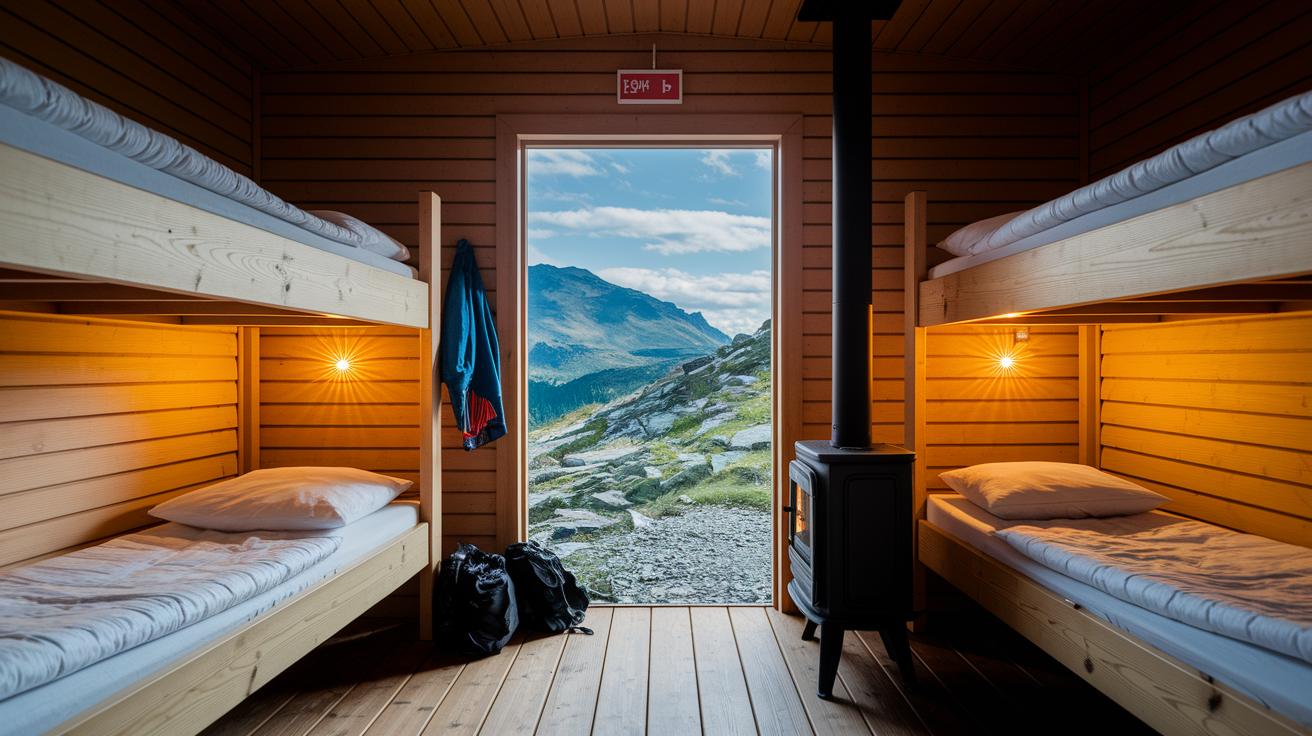
Mountain huts are simple places designed to keep you close to nature after a long day on the trail. They don’t offer luxury, but they give you all the basics you need. Most huts have a shared kitchen with a propane stove, plus cookware, plates, and dishware so you can cook a hot meal. You’ll also find bunk rooms with mattresses to rest and an outhouse stocked with toilet paper to keep things hassle-free. When night falls, solar-powered lighting adds a warm glow to the common areas.
Some larger huts take it a step further. They might have upper bunk rooms heated by a wood stove to keep the cold at bay in the evenings. The focus here is on a friendly, community feel rather than fancy comforts. Plan to pack lightly and remember that you’ll need to manage your own bedding and indoor comfort. Knowing what’s available helps you pack extra layers and indoor slippers so you can stay warm and cozy in these humble shelters.
Final Words
In the action, you set up a solid plan by mapping your route, checking weather and avalanche risk, and booking the perfect hut stay. This guide helped you break down each phase, from assembling gear and customizing your itinerary to sorting out essential safety procedures and budgeting smartly.
By knowing how to plan a hut trip step by step, you're all set for a safe and memorable mountain escape. Enjoy every step and every view along your path!
FAQ
How to plan a hut trip for beginners?
The planning for a hut trip for beginners starts by researching daily stages, checking weather forecasts and avalanche risks, booking huts ahead of time, and preparing all essential gear and safety supplies.
How to pack for a hut trip and what is on the packing list?
Packing for a hut trip means gathering essentials such as avalanche safety tools, extra clothing, sleep gear, and personal items. A detailed packing list ensures you’re ready for both trail and hut stays.
What is the difference between a hut trip tent and a cartop cabana?
A hut trip tent is a lightweight shelter for extra covering when huts are not available, while a cartop cabana fits on a vehicle’s roof for a secure sleep option during your trip.
What are the best 10th Mountain Division huts, including Leadville?
The best 10th Mountain Division huts include 10th Mountain Hut Leadville, Francie’s Cabin, Broome Hut, Sisters Hut, Ken’s Cabin, Shrine Mountain Inn, and Carner’s Cabin, each offering strong local charm and reliable amenities.
What can you expect from 10th Mountain Hut Leadville?
The 10th Mountain Hut Leadville provides a well-kept, safe shelter with comfortable amenities and a convenient location, making it a favored option among hikers.